The Trout Line Newsletter - March 15, 2021
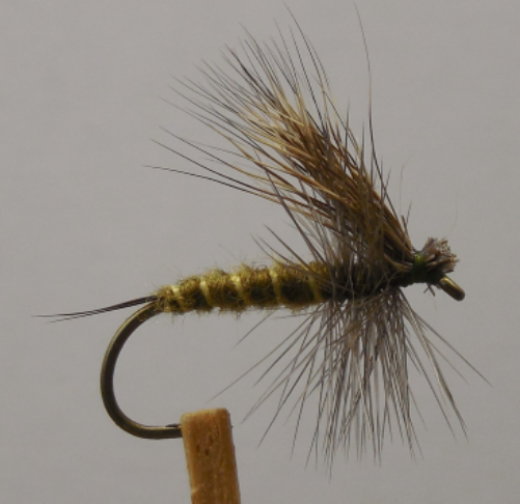
Fly of the Month - Western Green Drake
Materials:
Hook: Tiemco 100, #s 8-10
Thread: Olive 8/0
Tail: Moose mane
Ribbing: Yellow thread
Body: Olive brown ultrafine dubbing
Hackle: Dark Dun
Wing (hen wing): Slate or dark gray hen
Wing (hair wing): Medium dark deer
Sometimes bigger is better. The Green Drake is one of the bigger mayflies to emerge on Western waters, and produces exciting fishing on the Metolius and other rivers and streams. Here is a proven pattern for the adult, in two wing forms (hen wing and hair wing). I’ll lay out the hen wing pattern first, then the hair wing variant steps.
1. Select three stiff moose mane hairs, align the tips and tie in at the bend of the hook, positioning them so that the tail is somewhat shorter than the body.
2. Tie in a two inch or so piece of yellow thread at the tail tie-in point, leaving it trailing off the back of the hook.
3. Form a dubbing loop at the tail tie-in point and prepare a “dubbing yarn” of olive brown dubbing; wind and dub a slightly tapered body to about 1/3 of the way behind the eye. Tie off and clip the excess.
4. Counterwind the yellow thread five or six turns to the front of the body, tie off and clip.
5. Tie in a dun hackle (butt first, shiny side to be wound facing forward) at the front of the body, leaving it trailing off the back of the hook out of the way.
6. (hen wing) Match up two small hen body feathers, so that the curves of the feathers bend “outward”. Holding the tips of the feathers together with thumb and index finger, cut off the butt ends of the feathers so that you have only about ¾ to 5/8 inch of the tips left in your fingers. The wings when on the fly should be about ½ to 5/8 inch high or a smidgeon more.
7. Holding the wings pointing backward and tight down along the top of the hook shank and parallel to the ground, tightly wrap the butt ends of the hackle tips with five or six thread turns on top of the hook about 1/8 inch behind the eye. Then gently bend the hackle tips forward in your fingertips to about 45 degrees forward over the eye, and place two or three thread turns behind and against the now-upright hackle stems. That will help hold the wings in an upright position after the hackle is wound. The thread bobbin should end up wound forward of the wing, and hang just behind the eye.
8. Wind the hackle behind and in front of the upright wings, advancing to the tie-off point just behind the eye. For ease, I wind six or seven turn s behind the wings while holding the wings well forward with fingertips out of the way, and then switch and hold the wings backward out of the way while finishing the forward hackle. The wings can be properly moved, twisted if needed and repositioned when done.
9. Tie off and clip the hackle, finish the head and tie off with three half-hitches and a tiny drop of head cement. Gently adjust the wing positions with fingertips if needed.
6a. (hair wing) After steps 1-5 above, wind the hackle in tight turns forward to slightly more than 1/8 inch behind the hook. Tie off and clip.
7a. Clip a small bunch of deer hair, clean out the underhair, and stack. Then holding the hair bundle with your fingertips and pointing backward, tie in the hair bundle initially with two light turns. Position the hair so that it is on top of the hook, slightly flared and extending back at an angle and slightly longer than the body. Tie down tightly with five or six turns, finish, clip and cement.
More Information:
TVTU Website: https://tualatinvalley.tu.org/
TVTU Facebook Page: https://www.facebook.com/tualatinvalleyTU/
C4C Facebook Page: https://www.facebook.com/christmasforcoho/


