
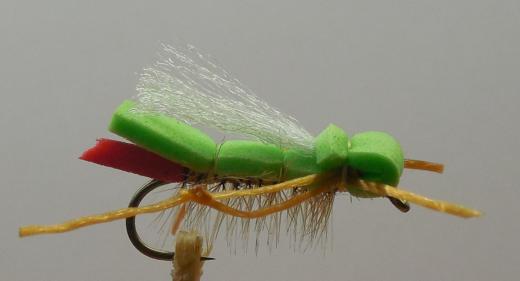
Fly of the Month - Green Hopper
Materials:
Hook: Tiemco 5262, #8
Thread: Tan 8/0
Tag: Red 2 mm foam
Underbody: Yellow 2 mm foam
Hackle: Cream or ginger
Body: 2 mm foam, color of choice
Wing: White or Crystal straight z-lon
Legs: Flat rubber legs, color of choice
This is a generic foam hopper pattern, arbitrarily tied in bold green “just because”. But other shades of green, brownish-green, tan, brown or even yellow-tan or yellow-green layered foam are effective, depending on the coloration of the hoppers in the particular area to be fished. Also, size varies dramatically based on location and weather; I’ve patterned an average hopper here. The twist I added over the usual patterns is the use of small palmered hackle over the underbody. My guide in Patagonia used it on many of his patterns, and thinks that it creates a bit of added disturbance in the water film and attracts the fish a bit better. I cannot argue with the results I had. This recipe looks long, but is not hard to accomplish.
1. Secure the thread and wind tightly to the beginning of the hook bend, to “coat” the hook metal with thread wraps. This helps prevent the fly body from turning.
2. Cut a thin tapered sliver of red foam for the “tail” tag, and tie in at the bend, extending just beyond the back of the hook.
3. Tie in a small (undersized for the size of the hook) hackle at the tie-in point of the tag, letting it stick off the back out of the way.
4. Cut a small (half the gap of the hook wide) strip of yellow foam, longer than the hook (so that you can hold the front end to position it), and position it so the back end is against the tie-in point of the tag. Tie down the foam end at that point with two ”medium-tight” turns of thread, while pinching the sides of the foam down on either side of the hook so that the foam “wraps” the hook on top and both sides. That way the yellow will show well from beneath. Lift the foam strip slightly and advance the thread along the hook toward the eye one or two turns, then repeat the foam wrap with two turns of thread. You are creating a segmented underbody advancing toward the eye. Repeat until you are about a quarter inch behind the eye, tie with several wraps and trim the excess foam strip.
5. Palmer the hackle forward to the front of the yellow foam, tie off and trim.
6. Cut a foam body strip the width of the hook gap but at least twice as long as the hook. Trim one end to slightly taper the last half inch (but not to a point).
7. Wrap the thread back over the palmered underbody with loose wraps to just in front of the hook bend, position the foam body on top and the butt end just short of the end of the red tag. Tie the body down at that point with five or six medium-tight turns of thread over one another (and perpendicular to the hook) so that the body bends slightly concave down over the underbody.
8. Lift the front of the body material and advance the thread forward over the underbody with loose wraps to a quarter inch or slightly more behind the hook eye. Holding the body foam down as before, tie the body down again at this point with five or six wraps.
9. Cut a two inch strip of z-lon and tie down on top of the body, leaving some excess length behind the back of the fly and enough in front to hold onto. Secure with five or six tightish wraps over the body wrap thread, lift the z-lon gently in front of the tie-in point and trim close to the tie-in point. I then put a small drop of fleximent or head cement on the tie-down point to help hold the wing in use.
